
Protecting Worksheets and Workbooks in Excel: If you are an excel user, then we are pretty sure you do not want anyone to mess up with your data. Excel is one of the most widely used spreadsheets for the purposes of saving data. And any Excel user would like to keep their saved data protected even after sharing it with collaborators to avoid discrepancies in the data.
And to help with this, Excel provides various tools with the help of which we can save the data in a protected format. So if you are a person who is looking for a way to protect data in Excel, then this page is for you. On this page, we have listed various ways to protect a workbook in Excel. Read further to find out more.
How Do I Protect Cells Worksheets and Workbooks in Excel?
You’ve put in a lot of effort on your spreadsheet. You don’t want somebody ruining it. Fortunately, Microsoft Excel has some decent capabilities for restricting users from editing different parts of a file.
Microsoft Excel’s protection is password-based and comes in three levels:
Workbook: There are several ways to protect a workbook. You can encrypt it with a password to restrict who can access it. You can set the file to open as read-only by default, forcing users to choose whether or not to alter it. And you secure a workbook’s structure so that anyone can open it, but they must provide a password to rearrange, rename, delete, or add new worksheets.
Worksheet: You can prevent changes to the data on individual worksheets.
Cell: You can also restrict changes to specific cells on a worksheet. Technically, this approach requires protecting a worksheet and then excluding specific cells from that protection.
You may even combine the levels of protection for different results.
Characteristics of Worksheets
The following list summarises the main characteristics of worksheets:
Cells:
Each worksheet contains a large number of cells that can be assigned values and formatted in numerous ways. You can insert, manipulate, and delete worksheet cells using the Cells property.
Rows and columns:
A worksheet’s cells are structured in rows and columns. A worksheet’s API allows you to insert, alter, and delete rows and columns. You can also change the height of certain rows and the width of columns.
Names (Named Ranges):
The Worksheet class exposes a Name of type NameCollection property that allows you to create, modify, and manage names.
UsedCellRange and GetUsedCellRange():
Because each worksheet contains over a million rows and over sixteen thousand columns, it is improbable that the full capacity of a worksheet will be used. A worksheet often uses only a portion of the available cells. However, in other cases, you may wish to know which part of the worksheet has your data and ignore the remainder of the cells. The Worksheet class’s UsedCellRange property returns a cell range that begins with cell A1 and includes all cells with data or formatting. You can acquire the used cell range by passing an IEnumerableIPropertyDefinition> object to the GetUsedCellRange() function, which has just the cells with certain property definitions.
Collection of Hyperlinks:
Each worksheet can have several hyperlinks to online pages, specific cells in the workbook, or email addresses.
Find and Replace:
Text and numbers in a worksheet’s content can be easily find and replace.
Protect an Entire Workbook from Editing
When it comes to protecting a whole Excel workbook, you have three options: encrypt the workbook with a password, make the workbook read-only, or secure simply the structure of the workbook.
Protecting Excel Worksheets and Workbooks
Below are the ways to protect the Excel worksheet and workbook using different methods
- Encrypt a workbook with a password:
- Making a workbook Read-only :
- Protect a Workbook’s Structure
- Protecting a worksheet from editing:
Encrypt a workbook with a password:
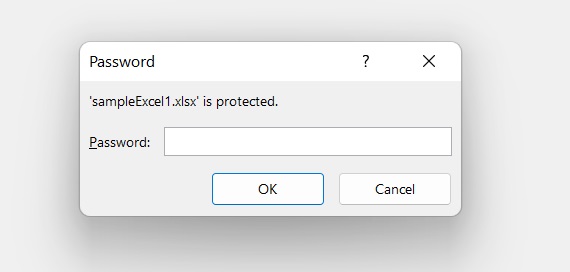
Encrypt the file with a password for maximum security. When someone tries to open the document, Excel first asks for a password.
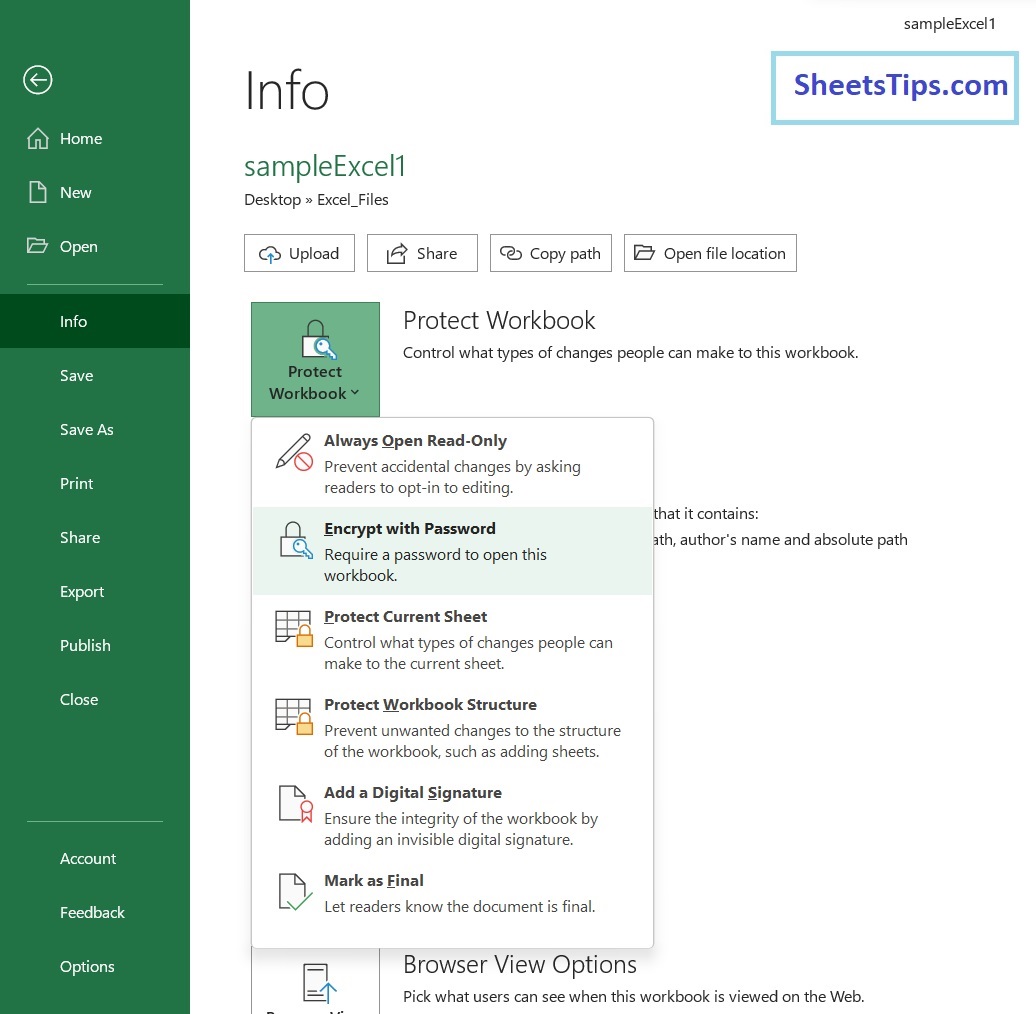
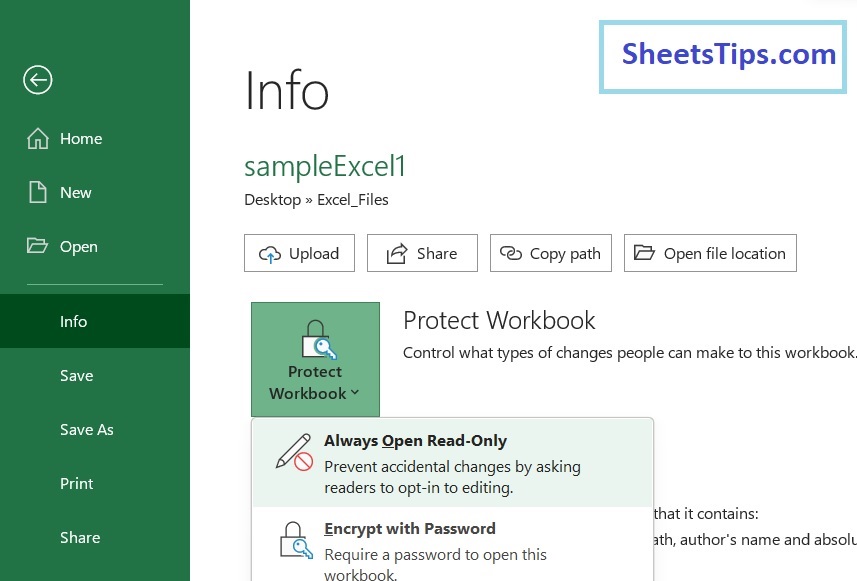
To get started, open your Excel file and navigate to the File menu. By default, you’ll see the “Info” category. Select “Encrypt with Password” from the dropdown menu after clicking the “Protect Workbook” button.
Enter your password in the Encrypt Document window that appears, then click “OK.”
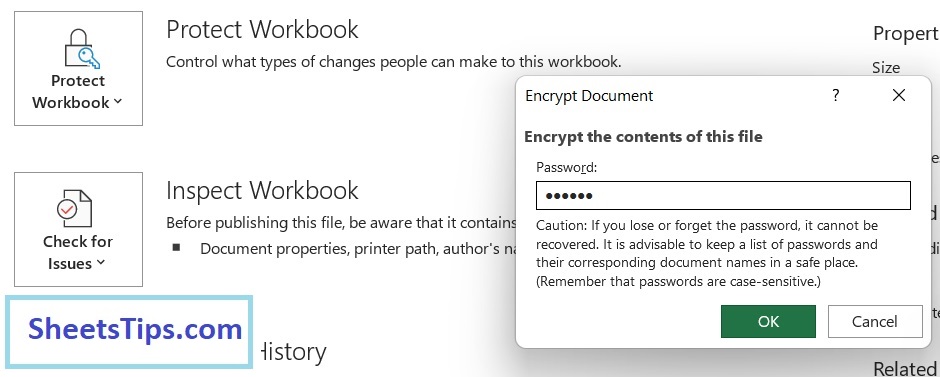
Take note of the warning message in this window. Excel does not allow you to recover a forgotten password, so choose one that you will remember.
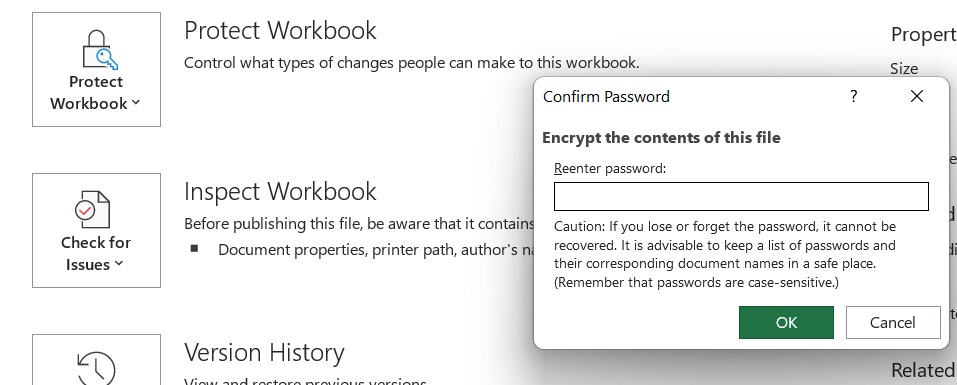
Enter your password once more to confirm, then click “OK.”
You’ll be returned to your Excel sheet. However, if you dismiss it, Excel will prompt you to enter the password the next time you open it.
If you ever wish to remove the password protection from the file, simply open it (which requires you to enter the current password) and then repeat the steps you used to assign the password. Make the password field empty this time, and then click “OK.”

Making a workbook Read-only :
It is really simple to make a worksheet open as read-only. It does not provide true protection because anyone who opens the file can enable editing, but it can serve as a reminder to be cautious when modifying the file.
Anyone (including you) who accesses the file now receives a warning stating that the file’s creator would prefer that they open it as read-only unless they need to make modifications.
Return to the File menu, select the “Protect Workbook” option again, and turn the “Always Open Read-Only” setting off to remove the read-only setting.
Protect a Workbook’s Structure
The third option to provide protection at the workbook level is to safeguard the structure of the worksheet. People who do not have the password are unable to make changes at the workbook level, which means they cannot add, remove, rename, or relocate worksheets.
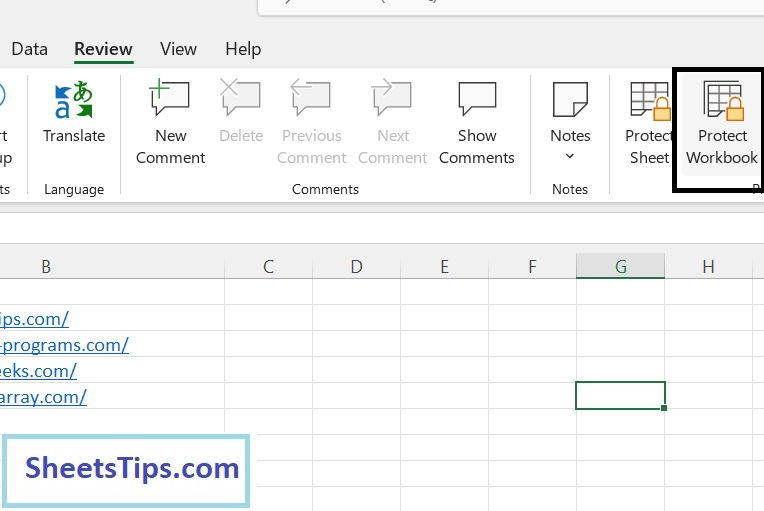
Select the Review tab>Protect workbook (under Changes ).
In the password box, type a password.

Click OK, then enter the password again to confirm and click OK again.
To remove the workbook’s password Continue to Review > Protect Workbook > Enter the password, and the workbook will be password-free.
Protecting a worksheet from editing:
Individual spreadsheets can also be protected from editing. When you protect a worksheet, Excel prevents you from altering any of the cells. When you protect your worksheet, no one can change, reformat, or delete the material.
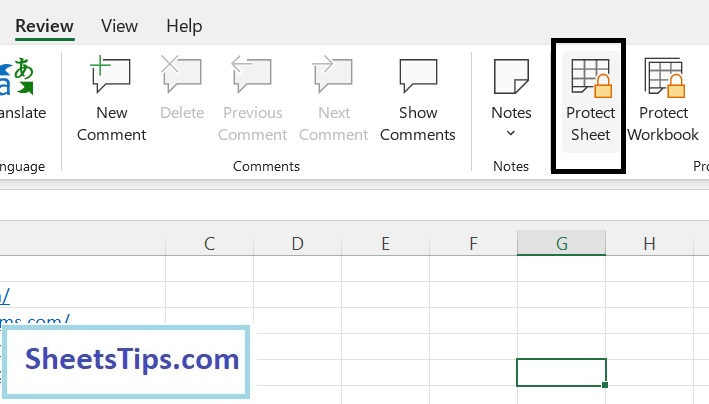
On the main Excel ribbon, select the “Review” tab.
This displays a project sheet window, prompting you to enter a password for the sheet. You can select which boxes the user should be permitted to edit after protection and uncheck the rest.
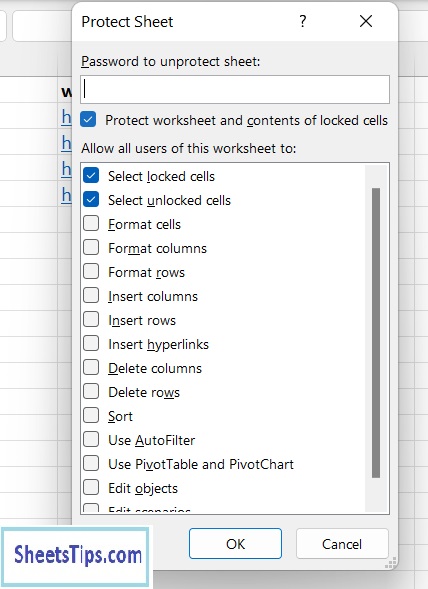
Click OK and confirm the password (do not forget this password).
Your sheet is now protected; try typing into it to see what Excel prompts you with!
If you wish to make changes to your sheet as a developer, go to the review tab>enter the password>make the changes.
Protecting your worksheet or workbooks helps in preventing unwanted changes to your data, such as adding, deleting, or moving the sheets or data. As a result, protecting your data becomes critical if you want to keep it safe from unauthorized changes. With the help of the Excel data protection methods provided above, protect your data from unnecessary changes.