
Have you ever wondered about creating a real time clock in Google Sheets? If yes, then you have landed on the right page. In this tutorial, let us learn how to create an analog clock in Google Sheets with the help of Google Sheets Tips. Scroll further to find more.
| Table of Contents |
How To Create Google Sheets Time Clock Template?
It’s no surprise that you are thinking to use of Script code, Widgets, Add-Ons to create Real Time clock in Google Sheets. However, you got it wrong. But to create a clock in Google Sheets, all you have to do is to use a simple formula which we have provided on this page.
- How to Convert Time to Military Time Format in Google Sheets?
- How to Create Leave Tracker Template in Google Sheet (Free Leave Tracker Template Download)
- Named Versions in Google Sheets: How to Name Version History in Google Sheets
- COLPAL Pivot Point Calculator
Steps to Build Real Time Clock in Google Sheets
The Steps to build real time clock in Google Spreadsheet are explained below:
- 1st Step: Open a blank Google Sheet on your device. Alternatively, you can also create a new Google Sheet.
- 2nd Step: Move to the Cell where you want to create a Real Time clock.
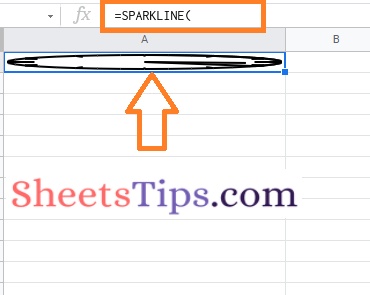
- 3rd Step: Now simply copy-paste the following formula in the blank cell.
| =SPARKLINE( ArrayFormula({ QUERY(ArrayFormula({ 0, 0, 1 + N(“See Comment 1”); 0, 0, 0.8 + N(“See Comment 2”) ; SEQUENCE(37,1,0,10), SIN(RADIANS(SEQUENCE(37,1,0,10))), COS(RADIANS(SEQUENCE(37,1,0,10))) + N(“See Comment 3”) ; SEQUENCE(12,1,30,30), 0.9 * SIN(RADIANS(SEQUENCE(12,1,30,30))), 0.9 * COS(RADIANS(SEQUENCE(12,1,30,30))) + N(“See Comment 4”) ; SEQUENCE(12,1,30,30), SIN(RADIANS(SEQUENCE(12,1,30,30))), COS(RADIANS(SEQUENCE(12,1,30,30))) + N(“See Comment 5”) ; SEQUENCE(4,1,90,90), 0.8 * SIN(RADIANS(SEQUENCE(4,1,90,90))), 0.8 * COS(RADIANS(SEQUENCE(4,1,90,90))) + N(“See Comment 6”) ; SEQUENCE(4,1,90,90), SIN(RADIANS(SEQUENCE(4,1,90,90))), COS(RADIANS(SEQUENCE(4,1,90,90))) + N(“See Comment 7”) }), “SELECT Col2, Col3 ORDER BY Col1”, 0 + N(“See Comment 8”) ) ; IF( MINUTE(NOW()) = 0, 0, SIN(RADIANS(SEQUENCE(MINUTE(NOW())/60*360,1,1,1))) ), IF( MINUTE(NOW())=0, 1, COS(RADIANS(SEQUENCE(MINUTE(NOW())/60*360,1,1,1))) ) + N(“See Comment 9”); 0, 0 + N(“See Comment 10”) ; 0.75 * SIN(RADIANS((MOD(HOUR(NOW()),12)/12 * 360) + MINUTE(NOW())/60 * 30)), 0.75 * COS(RADIANS((MOD(HOUR(NOW()),12)/12 * 360) + MINUTE(NOW())/60 * 30)) + N(“See Comment 11”) }), {“linewidth”,2 + N(“See Comment 12″) + N(” “)} ) |
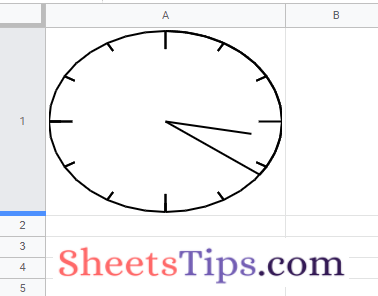
- 4th Step: Press the “Return” key. Initially, your Google Sheets clock will look like the following image.
- 5th Step: Now the next step is to make the row wider. For this place, the cursor in the row border and enlarge it using the fill handle. Enlarge the row as per your clock size.
- 6th Step: Now the Real Time Clock has been enlarged in the Google Sheets.
Now that we have created the Real Time Clock in Google Sheets. The next step is to make the clock tick.
Steps to Make Real Time Clock Tick in Google Sheets
In this step, we will have to make the real time clock to tick. The steps to make the clock tick has been provided below:
- 1st Step: Click on the “File” tab in the menubar.
- 2nd Step: Choose “Settings” from the drop-down menu.
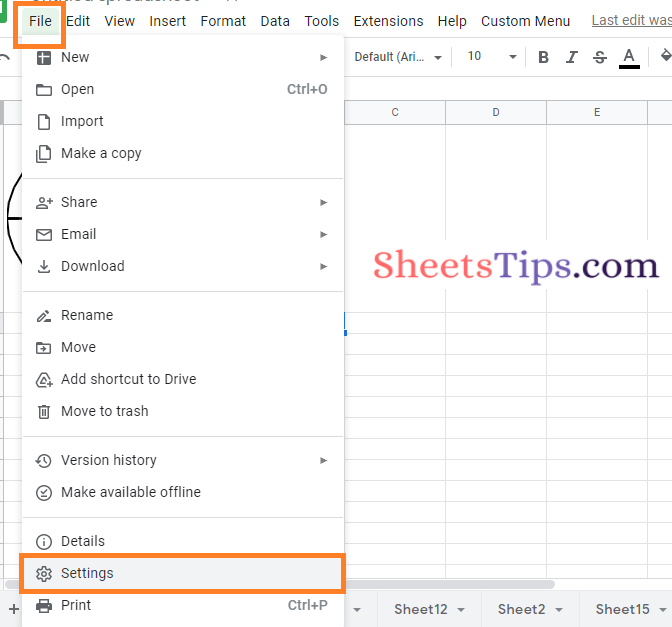
- 3rd Step: Click on the Calculation section and move to the “Recalculation” section.
- 4th Step: Under the Recalculation drop-down menu choose “On change and every minute“.
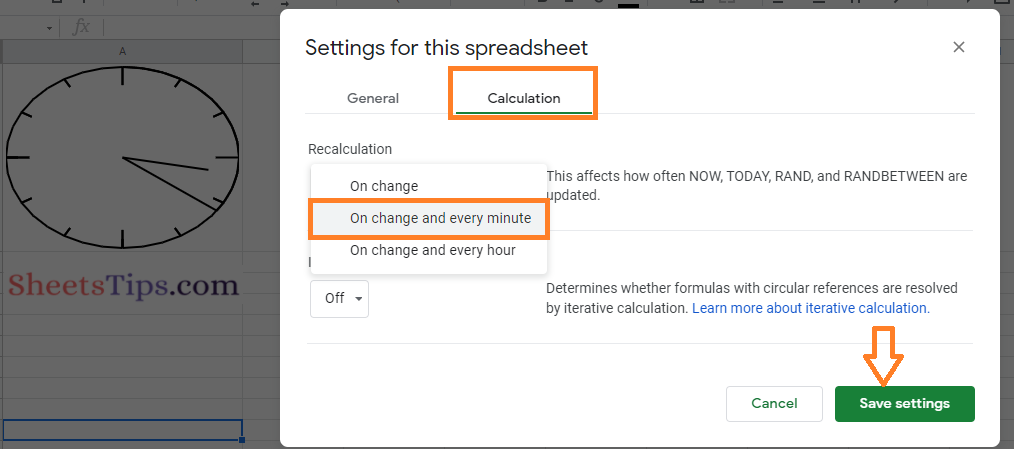
- 5th Step: Click on “Save Settings“.
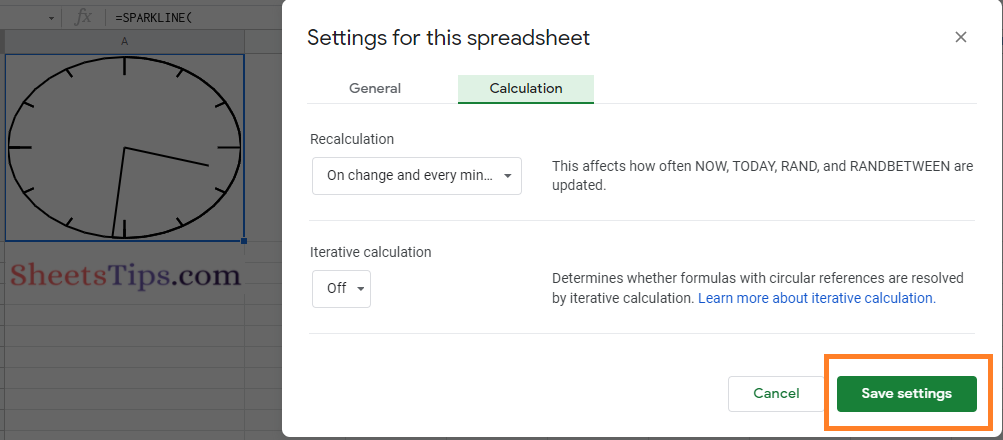
These steps will help us to refresh the NOW function that we have used in the formula every minute.
Now you must have noticed the hands of the clock moving every minute.
Formula Explanation of Real Time Clock
- Line 1: The initial (0,1) coordinate at the top of the circle. A 0 was added for sorting.
- Line 2: Coordinates for making a mark at 12 o’clock.
- Line 3: The beginning circle’s coordinates. Joins mark every 10 degrees beginning at the top of the circle, e.g. 0, 10, 20, 30,…360.
- Line 4: Coordinate sequence every 30 degrees to generate little markers for hours 1, 2, 4, 5, 7, 8, 10, and 11.
- Line 5: Coordinate sequence for connecting the 30-degree tiny markers. It was necessary to appropriately put them on the circle.
- Line 6: Coordinate sequence every 90 degrees to generate huge marks for hours 12, 3, 6, and 9.
- Line 7: Coordinate sequence for connecting the 90-degree big markers. It was necessary to appropriately put them on the circle.
- Line 8: The QUERY function was used to sort the circular data by the degrees column, then only the (x,y) coordinate columns (numbers 2 and 3) were utilized.
- Line 9: Coordinates for making the minute hand An IF statement is included to prevent an error when the minute hand reaches the 12 mark.
- Line 10: Coordinates to return to the center of the clock at (0,0) after drawing the minute hand, in order to create the hour hand.
- Line 11: Coordinates for making the hour hand
- Line 12: Set the Sparkline’s line width to 2.