Spreadsheet:
A spreadsheet is a type of computer program that captures, displays, and manipulates data that is organized in rows and columns. Spreadsheets are one of the most widely used tools on personal computers.
A spreadsheet is typically used to store numerical data as well as short text strings. Spreadsheet cells are the spaces in a spreadsheet program that house data elements. These can be renamed to better represent the information they contain and can be cross-referenced using row numbers and column letters.
Do you want a better answer than the one you created in a spreadsheet? If so, Python for Spreadsheet Users is an excellent introduction to the Python programming language that will set you on the way to automating tedious tasks, delving deeper into your data, and broadening the scope of what you are capable of accomplishing.
Excel is a popular spreadsheet program for data management. While it is time-consuming to write and update data in a long Excel sheet, Python helps in decreasing this effort and facilitating the creation, reading, and writing of Excel sheets. This can be accomplished using a variety of Python libraries.
Let us the following three methods here:
- Using Openxyl Library
- Using XLWT Library
- Using Xlsx writer Module
Python for Spreadsheet Users
Below are the ways to use python for Spreadsheet:
Method #1: Using Openxyl Library
Python Openpyxl package is used for reading and writing Excel (xlsx/xlsm/xltx/xltm) files. Python programmes can read and modify Excel files using the openpyxl package.
Openpyxl is a Python tool for reading and writing to and from Excel. Connecting to a local Excel file, allows you to access a specific cell or a group of cells. This information/data can be imported as a DataFrame or added to an existing DataFrame. You can also return data to Excel. You can automate the process of taking your Python operations and sending the output back to an Excel file as part of your Python script.
This library is widely used in the financial services industry. Large datasets are sometimes too slow to process in Excel; Openpyxl allows users to integrate Python into their workflow, where the processing can take place.
Installation:
To install this module, type the following command into the console.
pip install openpyxl
1)Create or Write a Workbook
Approach:
- Import Workbook from openpyxl module using the import keyword
- Import datetime module using the import keyword
- Create a workbook using the Workbook() function of the openpyxl module and store it in a variable
- Set the above workbook to active by applying the active attribute to the workbook and store this sheet in a variable
- Give some random value to the first cell of the worksheet
- Append data to the above-selected worksheet using the append() function by passing list of numbers as an argument to the append() function
- Assign the current date to the second cell(A2) using the datetime.now() function.
- Save the workbook by passing the fileName of the Excel spreadsheet as an argument to the save() function.
- The Exit of the Program.
Below is the implementation:
# Import Workbook from openpyxl module using the import keyword
from openpyxl import Workbook
# Import datetime module using the import keyword
import datetime
# Create a workbook using the Workbook() function of the openpyxl module and store it in a variable
workbookObj = Workbook()
# Set the above workbook to active by applying the active attribute to the workbook and store this sheet in a variable
worksheet = workbookObj.active
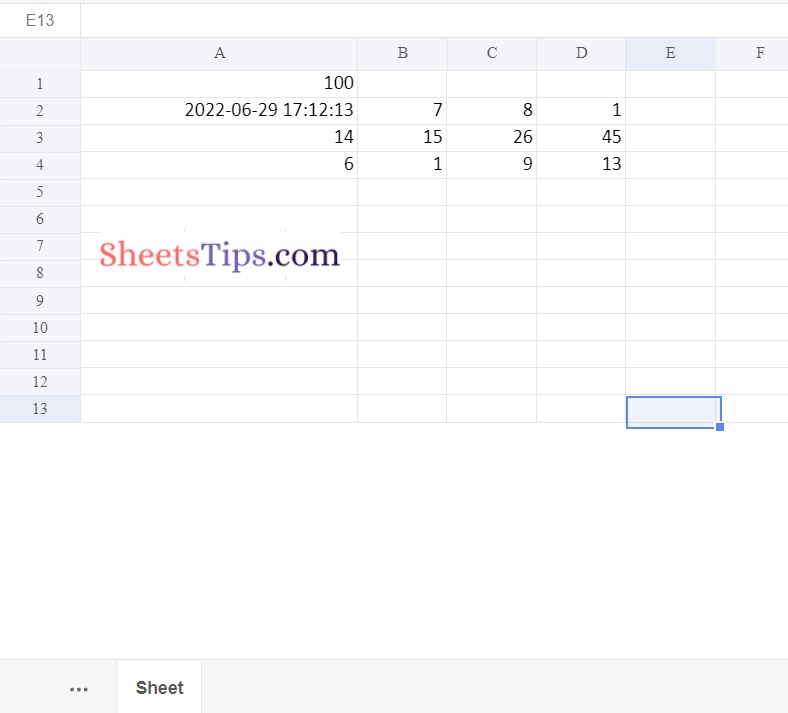
# Give some random value to the first cell of the worksheet
worksheet['A1'] = 100
# Append data to the above selected worksheet using the append() function by passing
# list of numbers as an argument to the append() function
worksheet.append([2, 7, 8, 1])
worksheet.append([14, 15, 26, 45])
worksheet.append([6, 1, 9, 13])
# Assign the current date to the second cell(A2) using the datetime.now()
worksheet['A2'] = datetime.datetime.now()
# Save the workbook by passing the fileName of the Excel spreadsheet as an argument to the save() function.
workbookObj.save("OutputExcelFile.xlsx")Output:
2)Read a Workbook
we can also read a workbook object using the below code.
Approach:
- Import load_workbook function from openpyxl module using the import keyword
- Import Workbook function from openpyxl module using the import keyword
- Pass the excel filename as an argument to the load_workbook() function
and store it in a variable. - Here it reads the workbook.
- The Exit of the Program.
Below is the implementation:
# Import load_workbook function from openpyxl module using the import keyword
from openpyxl import load_workbook
# Import Workbook function from openpyxl module using the import keyword
from openpyxl import Workbook

# Pass the excel filename as an argument to the load_workbook() function
# and store it in a variable.
# Here it reads the workbook.
workbookObj = load_workbook(filename = 'sampleExcelFile.xlsx')
3)Insert Images into the Workbook
Approach:
- Import Workbook function from openpyxl module using the import keyword
- Import Image from drawing.image of openpyxl module using the import keyword
- Create a workbook using the Workbook() function of the openpyxl module and store it in a variable
- Set the above workbook to active by applying the active attribute to the workbook and store this sheet in a variable
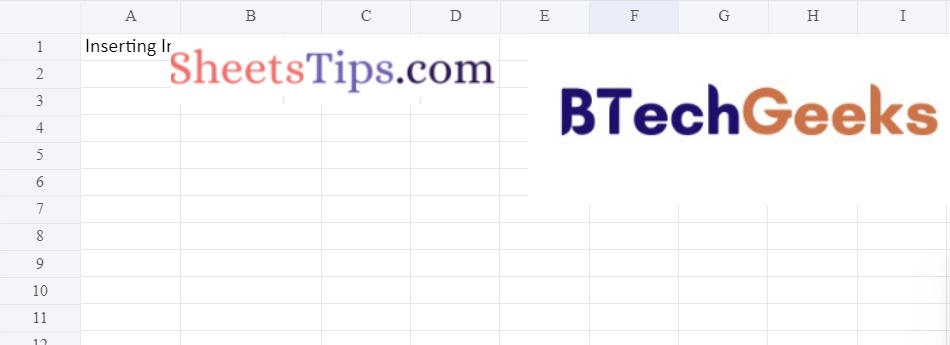
- Give some random title to the first cell(A1) of the worksheet
- Read/load an image using the Image() function by passing the image filepath as an argument to it and
- Store it in another variable
- Read another image and store it in another variable
- Insert the first image into the first cell(A1) of the worksheet using the add_image() function
- Insert the second image into the F1 cell of the worksheet using the add_image() function
- Save the workbook by passing the fileName of the Excel spreadsheet as an argument to the save() function.
- The Exit of the Program.
Below is the implementation:
# Import Workbook function from openpyxl module using the import keyword
from openpyxl import Workbook
# Import Image from drawing.image of openpyxl module using the import keyword
from openpyxl.drawing.image import Image

# Create a workbook using the Workbook() function of the openpyxl module and store it in a variable
workbookObj = Workbook()
# Set the above workbook to active by applying the active attribute to the workbook and store this sheet in a variable
worksheet = workbookObj.active

# Give some random title to the first cell(A1) of the worksheet
worksheet['A1'] = 'Inserting Images'

# Read/load an image using the Image() function by passing the image filepath
# as an argument to it and store it in another variable
image_1 = Image('SheetsTips.png')
# Read another image and store it in another variable
image_2 =Image('Btechgeeks.png')

# Insert the first image into the first cell(A1) of the worksheet using the add_image() function
worksheet.add_image(image_1, 'B1')
# Insert the second image into the F1 cell of the worksheet using the add_image() function
worksheet.add_image(image_2, 'F1')
# Save the workbook by passing the fileName of the Excel spreadsheet as an argument to the save() function.
workbookObj.save('ImageInsertion.xlsx')
Output:
Method #2: Using XLWT Library
The XLWT Library allows developers to create spreadsheet files that are compatible with Microsoft Excel versions 95 to 2003. We can not only enter values into cells, but we can also format them. The values can be styled bold, colored, italicized, and so on. Font size can also be adjusted.
Installation:
Use the following command to install the Python XLWT package.
pip install xlwt
 (or)
pip3 install xlwt
1)Create or Write a Workbook And adding Stylings to It
Approach:
- Import xlwt module using the import keyword
- Import datetime fron datetime module using the import keyword
- Pass the font style, color and text as bold stylings as arguments to the easyxf() function of the xlwt module and store it in a variable
- Format the date in the format “DD-MM-YY” using the easyxf() function of the xlwt module and store it in another variable.
- Pass the font style, color and text as bold stylings as arguments to the easyxf() function of the xlwt module and store it in a variable
- Create a workbook using the Workbook() function of the xlwt module and store it in a variable
- Add a new worksheet to the above Workbook using the add_sheet() function by passing some random sheet name to it.
- Store it in another variable
- Insert data into the cells by passing the row number, column number, data, styles as arguments to write() function (Here it applies the style1 to the 1st cell)
- Save the workbook by passing the fileName of the Excel spreadsheet as an argument to the save() function.
- The Exit of the Program.
Below is the implementation:
# Import xlwt module using the import keyword
import xlwt
# Import datetime fron datetime module using the import keyword
from datetime import datetime
# Pass the font style, color and text as bold stylings as arguments to the
# easyxf() function of the xlwt module and store it in a variable
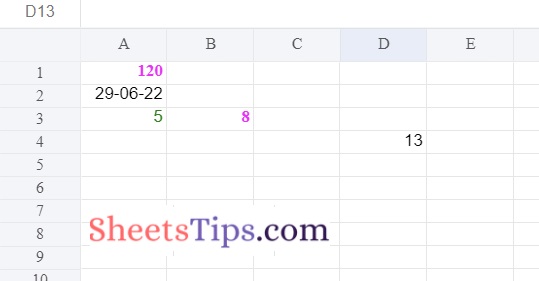
style_1 = xlwt.easyxf('font: name Italic, color-index pink, bold on',)
# Format the date in the format "DD-MM-YY" using the easyxf() function of
# the xlwt module and store it in another variable
style_2 = xlwt.easyxf(num_format_str='DD-MM-YY')
# Pass the font style, color and text as bold stylings as arguments to the
# easyxf() function of the xlwt module and store it in a variable
style_3 = xlwt.easyxf(
'font: name Arial, color-index green')
# Create a workbook using the Workbook() function of the xlwt module and store it in a variable
workbookObj = xlwt.Workbook()
# Add a new worksheet to the above Workbook using the add_sheet() function
# by passing some random sheet name to it.
# store it in another variable
worksheet = workbookObj.add_sheet('Adding Stylings into a Sheet')
# Insert data into the cells by passing the row number, column number, data,
# styles as arguments to write() function (Here it applies the style1 to the 1st cell)
worksheet.write(0, 0, 120, style_1)
worksheet.write(1, 0, datetime.now(), style_2)
worksheet.write(2, 0, 5, style_3)
worksheet.write(2, 1, 8, style_1)
worksheet.write(3, 3, xlwt.Formula("A3+B3"))
# Save the workbook by passing the fileName of the Excel spreadsheet as an argument to the save() function.
workbookObj.save('excel_Stylings.xlsx')Output:
Method #3: Using Xlsx writer Module
XlsxWriter is a Python module that allows you to create files in the Excel 2007+ XLSX file format. XlsxWriter offers functionality such as writing text, numbers, formulas, and hyperlinks to multiple worksheets.
Here’s an easy example:
Worksheet PNG/JPEG/BMP/WMF/EMF images, Conditional formatting Multiformat strings in abundance, Comments from the cell. Textboxes., Pandas integration. Macros can also be added.
Installation:
Use the following command to install the Python XLWT package.
pip install XlsxWriter
 (or)
pip3 install XlsxWriter
Output:
Looking in indexes: https://pypi.org/simple, https://us-python.pkg.dev/colab-wheels/public/simple/
Collecting XlsxWriter
Downloading XlsxWriter-3.0.3-py3-none-any.whl (149 kB)
|████████████████████████████████| 149 kB 7.2 MB/s
Installing collected packages: XlsxWriter
Successfully installed XlsxWriter-3.0.3
Approach:
- Import xlsxwriter module using the import keyword
- Create a workbook using the Workbook() function of the xlsxwriter module by passing the excel file name as an aegument to it and store it in a variable
- Here we are opening an excel file
- Add a new worksheet to the above workbook using the add_worksheet() function and store it in another variable.
- Increase the width of the first column to make the text more clearly visible.
- Add a bold format using add_format() function to highlight the cells of the above workbook and store it in another variable.
- Insert/add data to the first cell(A1) of the worksheet using the write() function
- Insert/add data to the second cell(A2) of the worksheet using the write() function with adding the above bold styling to it.
- Insert an image in the C5 cell using the insert_image() function.
- Close the above workbook object using the close function.
- The Exit of the Program.
Below is the implementation:
# Import xlsxwriter module using the import keyword
import xlsxwriter
# Create a workbook using the Workbook() function of the xlsxwriter module
# by passing the excel file name as an aegument to it and store it in a variable
# Here we are opening an excel file
workbookObj = xlsxwriter.Workbook('sampeExcelFile.xlsx')
# Add a new worksheet to the above workbook using the add_worksheet() function
# and store it in another variable
worksheet = workbookObj.add_worksheet()
# Increase the width of the first column to make the text more clearly visible.
worksheet.set_column('A:A', 20)
# Add a bold format using add_format() function to highlight the cells of the above
# workbook and store it in another variable
style_bold = workbookObj.add_format({'bold': True})
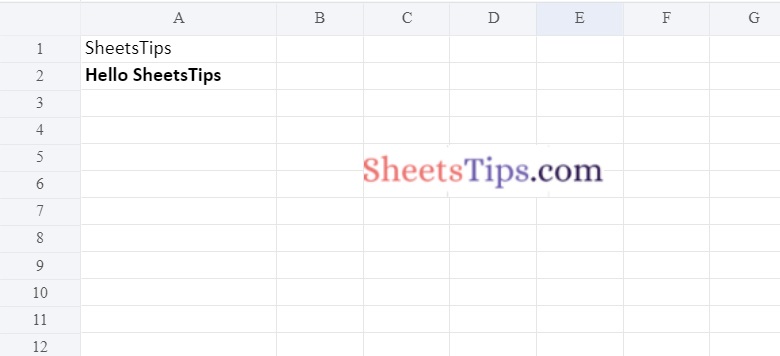
# Insert/add data to the first cell(A1) of the worksheet using the write() function
worksheet.write('A1', 'SheetsTips')
# Insert/add data to the second cell(A2) of the worksheet using the write() function
# with adding the above bold styling to it
worksheet.write('A2', 'Hello SheetsTips', style_bold)
# Insert an image in the C5 cell using the insert_image() function
worksheet.insert_image('C5', 'SheetsTips.png')
# Close the above workbook object using the close function
workbookObj.close()Output: