When working in Google Sheets, we need to organize our data to make it more readable. One of the ways to organize the dataset in Google Sheets is to make use of the Group Columns feature. With the help of this feature, we can easily group a set of columns as per the specifications. In this article, let’s understand how to group columns, expand or collapse columns with important Google Sheet Tips. Read on to find out more.
|
Table of Contents |
How to Group Columns in Google Sheets?
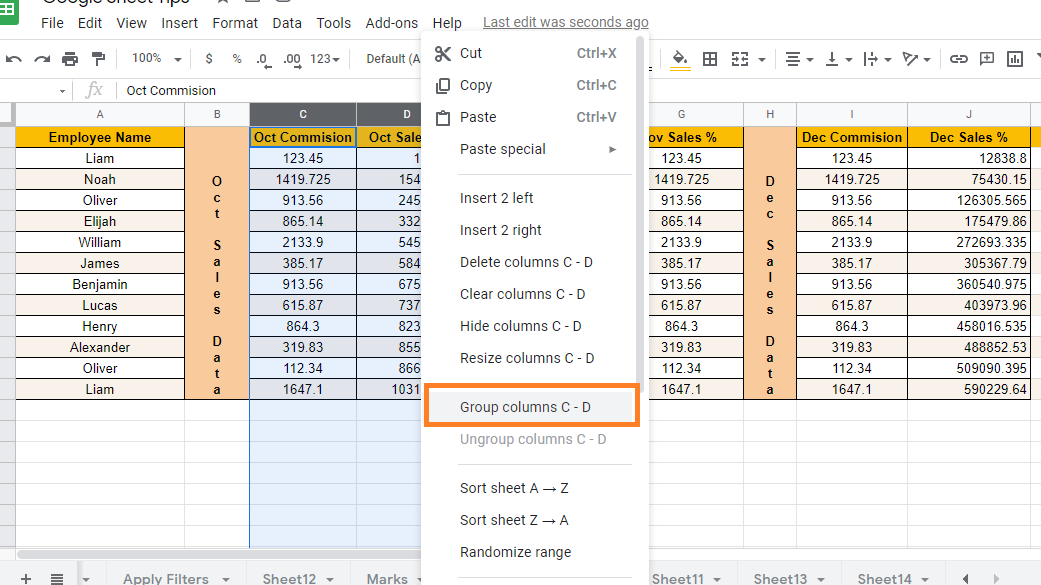
Let’s consider the following dataset to group the columns in Google Sheets. If we could classify the months into quarters, this dataset would be considerably more ordered and easier to navigate. So, let’s look at the steps we will need to take to achieve this.

Follow the steps as listed below to Group columns in Google Sheets:
- Step 1: Open the Google Spreadsheet where you want to group columns.
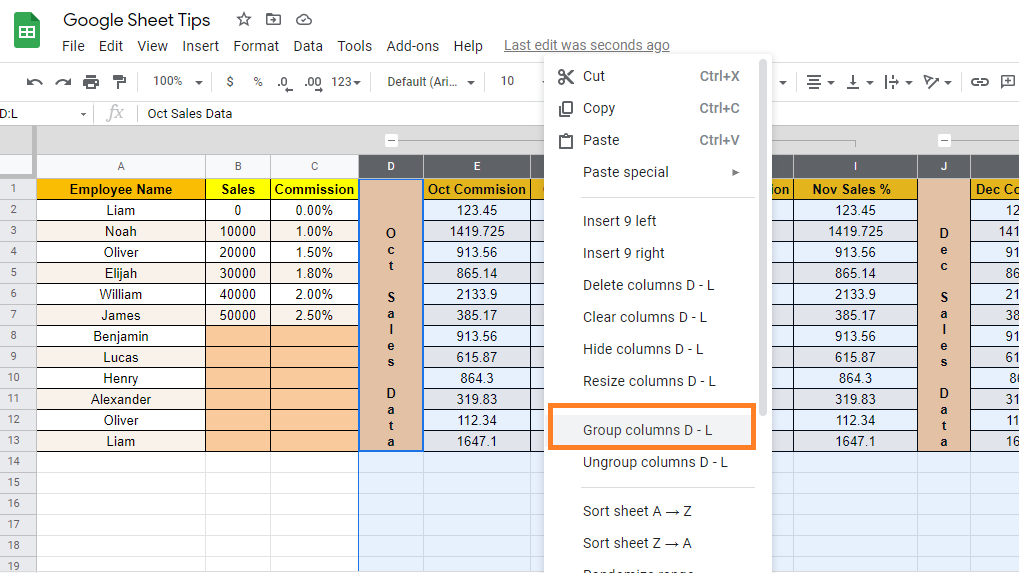
- Step 2: Now select the number of columns that you would like to group. For this select the header of the columns. Selecting the header of the columns would select the entire column range.
- Step 3: Soon after selecting the columns, Right-click on the sheet. Now formatting pane window opens on the screen.
- Step 4: Choose “Group Columns” from the drop-down menu.
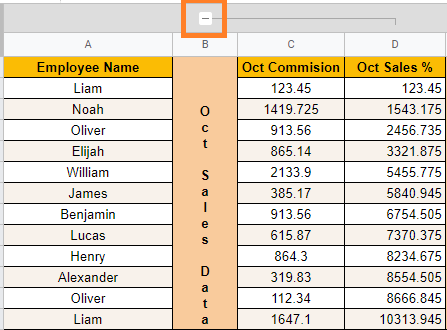
- Step 5: The columns will be grouped together, and a minus icon (to collapse the column) will appear at the column header to the left of the group.
- Step 6: Now to group the desired number of columns, repeat the steps outlined above.
That’s it. The selected range of columns is now grouped together. The minus icon that displays on top of each group is accompanied by a line that spans the columns that make up the group, making it easy to determine which columns are included.

Collapsing and Expanding the Grouped Columns
You may quickly extend and collapse each group once your columns have been grouped together. To collapse or expand the columns in Google Sheets, follow the steps as listed below:
- Step 1: Open the Google Spreadsheet where you would like to collapse or expand the columns.
- Step 2: When you click on the Minus icon on the top of the grouped column, the columns in the group will be hidden and the icon itself changes to a plus icon.
- Step 3: Simply click the + icon to expand the columns once more, and the grouped columns will be visible once more.
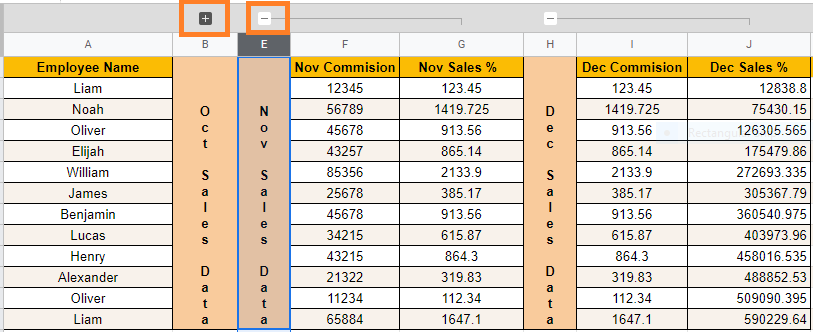
Now the group will be expanded.
- How to Wrap Text in Google Sheets: Expand Cell using Text Wrap
- How to Split Text to Columns in Google Sheets: Split Cell Horizontally/Vertically
- How to Sort Data in Google Sheets: Built-in Function & Keyboard Shortcuts
However, when you have a huge number of grouped columns, then it would be difficult for you to expand all the columns. In order to expand all the columns in one go, follow the steps listed below:
- Step 1: Open the Google Spreadsheet where you would like to expand the columns.
- Step 2: Now Right-click on any of the minus icons on the grouped column header.
- Step 3: Just click on Collapse All Column Groups from the drop-down menu.
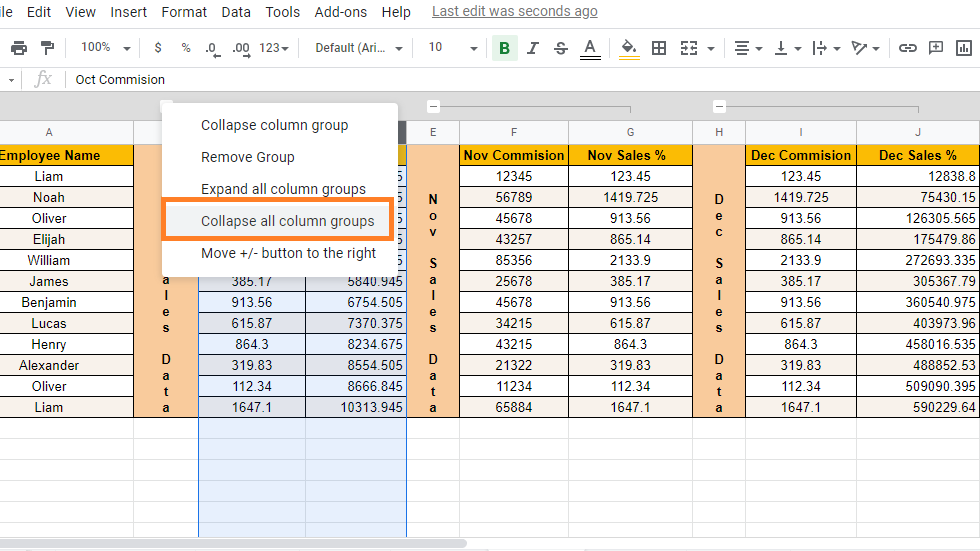
This will collapse all the grouped columns on the Google Sheets.
How to Create Multiple Layers of Grouped Columns?
We can create multiple layers of grouped columns in Google Sheets which will make the huge dataset more readable. The steps to create multiple layers of column groups in Google Sheets are explained below:
- Step 1: The first step in creating multiple layers of columns is to expand all the columns groups which were created earlier.
- Step 2: Select all the groups which were created earlier.
- Step 3: Right-click on any of the select cells. The context menu opens on the screen.
- Step 4: Here select “Group Columns Cell Range” from the drop-down menu.
- Step 6: The selected columns will now be grouped together, and you will have two layers of grouping. This is visible in the grey stripe that runs across all of the column headers.
- Step 7: If you want to group other multiple groupings of columns, repeat the process.

On top of the previous layer of minus/plus icons, the grey region contains a new minus icon.
This icon is also accompanied by a line that spans the columns that make up the group, making it simple to see which columns (or groups of columns) are included.
The largest group will be the initial (or top-most) layer. All of the quarter’s columns will be concealed when you collapse it. The sub-groups of columns will be the layers beneath this. You can further group and subgroup the columns as needed, and the grey area at the top allows you to see how all of your columns have been arranged.
How to Ungroup Columns in Google Sheets?
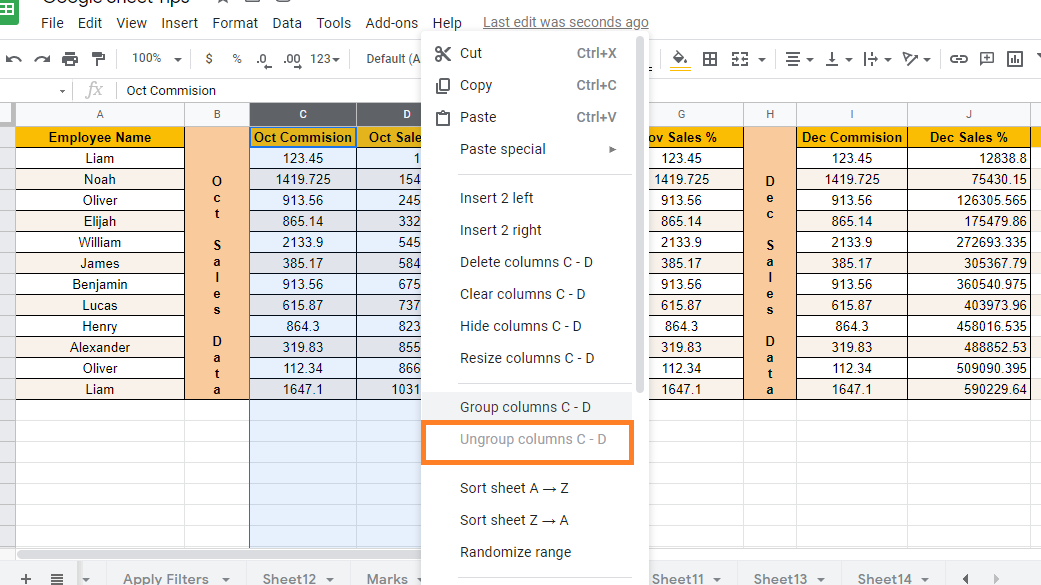
In order to ungroup columns in Google Sheets, select the grouped columns and right-click anywhere on the cell. Now just select Ungroup (Cell Range). The selected columns will be ungrouped.
Advantages of Using Grouped Columns in Google Sheets
You might be wondering that what’s the point of having a separate function to group and ungroup sheets when Google Sheets already has the option to hide/unhide columns. Both provide results that are similar in certain ways. So, here’s how you can utilize grouped columns in Google Sheets:
- It can be used to keep your info structured and simple to read.
- It allows you to organize columns at various levels and hide/unhide groups and sub-groups as needed.
- It allows you to effectively extend and compress areas of your worksheet while maintaining a tidy appearance.
