
Google Sheets comes with rows and columns. While working with a dataset in Google Spreadsheet, the software allows you to insert rows and columns in between. Also, we can delete the rows and columns in Google spreadsheets in between the cells which are not required.
In this article, we have explained everything about how to add or remove rows and columns in a Spreadsheet with the help of Google Sheets Tips. Read further to find more.
How to Add Rows or Columns in Google Sheets?
We can easily add rows or columns in Google Sheets in 3 easy steps which are given below:
Steps to Add Rows in Google Sheets
Follow the steps as given below to add rows in Google Spreadsheets:
- Step 1: Open the Google Sheets where you want to insert the row.
- Step 2: Now select the cell where you want to insert the row.
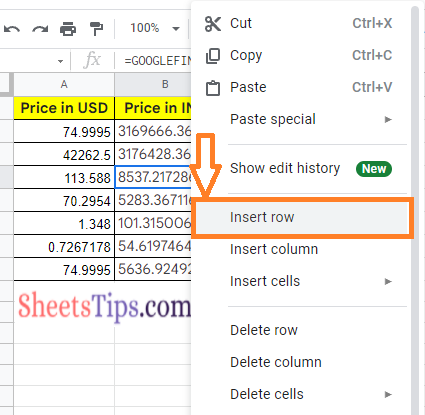
- Step 3: Right-click anywhere on the screen and select “Insert Row”.
- Step 4: This will simply insert the rows in the Google Sheets.
Alternatively, you can simply select the row and click on the “Insert” tab and then choose “Row below” or “Row above”. This will simply insert the rows in the Google Sheets.
- Google Sheets Keyboard Shortcuts for PC, MAC, Chrome OS
- How To Add Underline Format in Google Sheets? – Underline Cells, Rows, Text in Spreadsheet
- How to Make Tables in Google Sheets? Using Google Sheets Formatting Options
Steps to Add Columns in Google Sheets
Follow the instructions as given below to add columns in Google Sheets:
- Step 1: Open the Google Spreadsheet where you want to insert the columns.
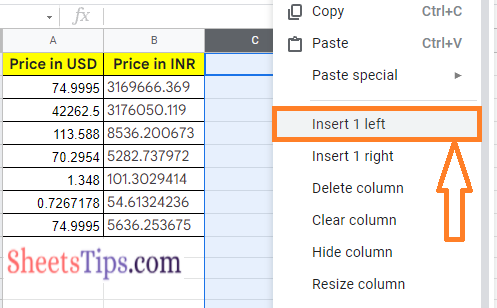
- Step 2: Now select the column where you want to insert the new column and right-click anywhere on the screen.
- Step 3: Here you will be given two options – Column Left and Column Right. Select the option where you want to insert the columns.
- Step 4: This will simply insert the columns in Google Sheets.
How to Remove Rows and Columns in Google Sheets?
Like we add rows or columns in Google Sheets, we can simply remove and columns. The steps through which we can remove rows and columns in Google Spreadsheets are as follows.
Steps to Remove Rows in Google Sheets
Follow these steps to remove rows in Google Spreadsheets:
- Step 1: Open the Google Spreadsheet where you want to remove the rows.
- Step 2: Select the rows which you want to delete.
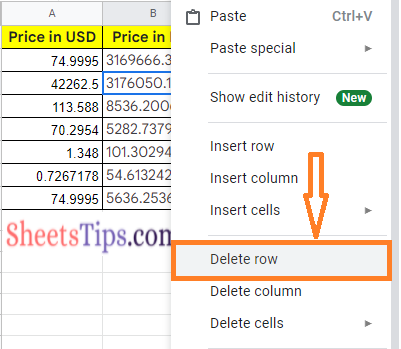
- Step 3: Now right-click on the spreadsheet and you will be prompted with sub-menu options.
- Step 4: Choose “Delete Row” from the drop down menu and this will delete the selected rows.
Steps to Remove Columns in Google Sheets
Follow the steps as given below to delete the columns in Google Spreadsheet:
- Step 1: Open the Google Sheets from where you want to remove or delete the columns
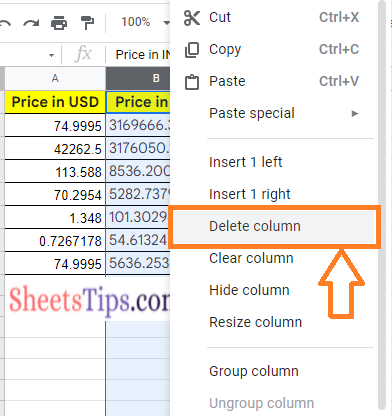
- Step 2: Now select the columns which you want to delete and right click anywhere on the screen.
- Step 3: In the submenu options, choose “Delete Columns”. This will simply delete all the selected columns.
Keyboard Shortcuts to Add or Remove Rows & Columns in Google Sheets
If you are a person, who is not well with the above-listed steps, you can simply use the Google Sheets Keyboard Shortcuts. With the help of the following keyboard shortcuts, you delete or add columns and rows in Google Spreadsheets.
Windows Keyboard shortcuts for Adding or Deleting Rows & Columns
- To insert rows above: Alt+I, then R (Chrome) or Alt+Shift+I, then R (Other browsers)
- To insert rows below: Alt+I, then W (Chrome) or Alt+Shift+I, then W (Other browsers)
- To insert columns to the left: Alt+I, then C (Chrome) or Alt+Shift+I, then C (Other browsers)
- To insert columns to the right: Alt+I, then O (Chrome) or Alt+Shift+I, then O (Other browsers)
macOS Keyboard shortcuts for Adding or Deleting Rows & Columns
- To insert rows above: Ctrl+Option+I, then R
- To insert rows below: Ctrl+Option+I, then W
- To insert columns to the left: Ctrl+Option+I, then C
- To insert columns to the right: Ctrl+Option+I, then O