
When working with Google Sheets, it is quite common where we might insert rows or columns in between the data. In Google Sheets, we can easily insert the rows in two methods namely using the insert tab and Right-clicking on the data. In this article, let us understand how to insert multiple rows with the help of Sheet tips provided on this page. Read on to find more.
Table of Contents |
How to Insert Single Row Above and Below the Dataset?
Follow the steps listed below to insert a single row above or below the dataset.
Using Insert Tab to Single Row Above or Below
Let us consider the following dataset where we need to insert a row above the third row and below the third row. The steps to achieve the same using the INSERT tab is given below:
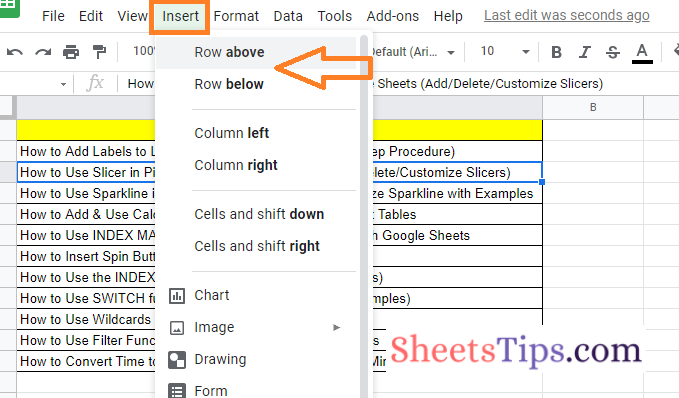
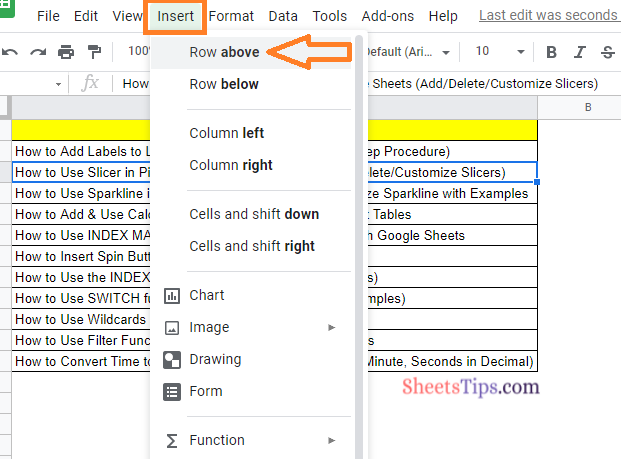
- Step 1: Select the Row 3.
- Step 2: Now click on the “Insert” tab in the menubar.
- Step 3: Choose “Row Above“. This will insert a row above the dataset as shown in the image below.
- Step 4: Choose “Row Below“. This will insert a row below the dataset as shown in the image below.
Using Right-Click Menu to Insert Row in Google Sheets
We will use the same dataset which we have used in the previous section. Now follow the steps as given to below to insert a row above the third row and below the third row using the Right-click menu option.
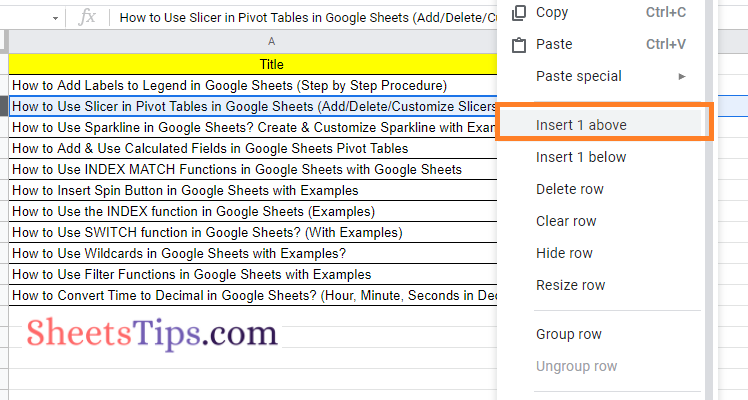
- Step 1: Select Row number 3. (You can head and select the row number where you would like to insert multiple rows).
- Step 2: Now Right-click anywhere on the spreadsheet.
- Step 3: Click on “Insert 1 above” to insert a row above the third row.
- Step 4: If you want to insert a row below the third row, then choose “Insert 1 below” and it will insert a row below the dataset.
- How To Insert Indents in Google Sheets? – Know How to Tab Down in Google Sheets
- How to Color Alternate Rows in Google Sheets: Alternating Colors Every 2 Rows, 3 Rows
- How to Unhide Rows in Google Sheets: Unhide Rows/Columns in 2 Clicks
How to Insert Multiple Rows in Google Sheets?
We can use both the INSERT tab and Right-click menu to insert the multiple rows in the Google Sheets. Alternatively, we can also use the Google Sheets keyboard shortcuts to insert multiple rows in the dataset.
Insert Multiple Rows using Insert Tab
The steps to insert multiple rows using the Insert Tab are given below:
- Step 1: Open the Google Spreadsheet where you want to insert the multiple rows.
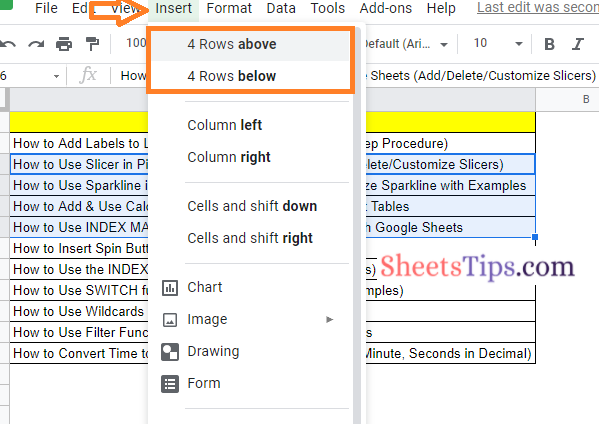
- Step 2: Now select the number of rows you would like to insert. Suppose if I want to insert 4 rows above the 3rd row, then I am supposed to select 4 rows from row 3 as shown in the image below.
- Step 3: Then click on the “Insert” tab
- Step 4: Now choose “4 Rows above“. This will insert 4 rows above the third row.
- Step 5: If you choose “4 Rows below“, it will insert 4 rows below the third row as shown in the image below.
Insert Multiple Rows using Right-click Menu
The steps to insert multiple rows using the Right-click menu in Google Sheets are given below:
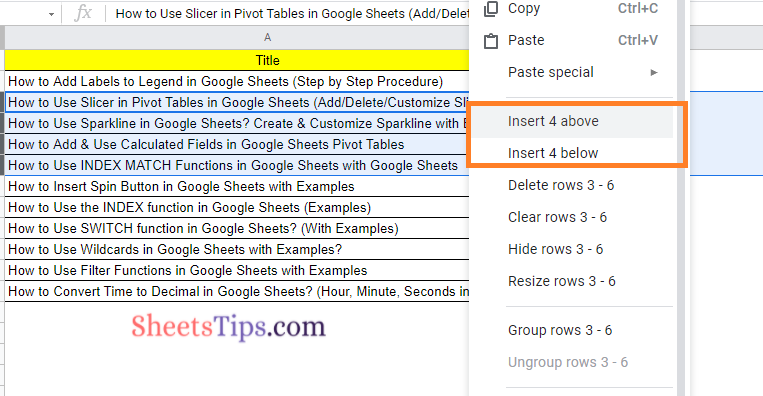
- Step 1: Select the rows where you wish to insert multiple rows in Google Sheets. If you want to insert four rows above the third row, select four rows from row three, as shown in the image below.
- Step 2: Now Right-click anywhere on the screen.
- Step 3: Click on “Insert 4 above“. This will insert 4 rows above the selected row in the dataset.
- Step 4: To insert 4 rows below, click on the “Insert 4 below” from the sub-menu as shown below.
Insert Multiple Rows using Keyboard Shortcuts in Google Sheets
We can insert multiple rows that are not contiguous in Google Sheets with keyboard shortcuts. For instance, suppose you want to insert rows above rows #3, 5, and 8. You can do this all at once because the rows aren’t consecutive. One of your options is to insert each row one at a time using one of the methods discussed earlier.
Then there is another way to use the F4 keyboard shortcut. While this shortcut does not complete the task all at once, it does expedite the process.
The following are the steps to insert multiple rows in Google Sheets that are not contiguous (above row # 3, 5, and 8):
- Step1: By clicking on the row header of row #3, you may select the row (or any cell in the dataset)
- Step 2: Navigate to the Insert tab.
- Step 3: Select the ‘Row above‘ option from the drop-down menu. This will add a row to the right of row #3.
- Step 4: In row #5, select any cell.
- Step 5: Press the F4 key.
- Step 6: Any cell in row #8 should be selected.
- Step 7: Press the F4 key.
The F4 key merely repeats the previous action, in this case, inserting a row above the selected row.