Google Sheets allows us to share and collaborate the spreadsheet with various users online. However, sharing the Google Sheets with multiple users might lead to discrepancies in the data and might also result in formatting errors. Thus it is important for one to always protect the data in Google Sheets. On this page, let us discuss 3 easy methods with the help of which we can protect our data with the help of Google Sheet tips. Read further to find more.

Table of Contents |
How to Protect Google Spreadsheet Data?
We can protect our Google Spreadsheet data with the help of the following three methods:
- Protecting Entire Worksheet
- Setting up Notifications if someone tries to edit cells
- Setting up Data Validation
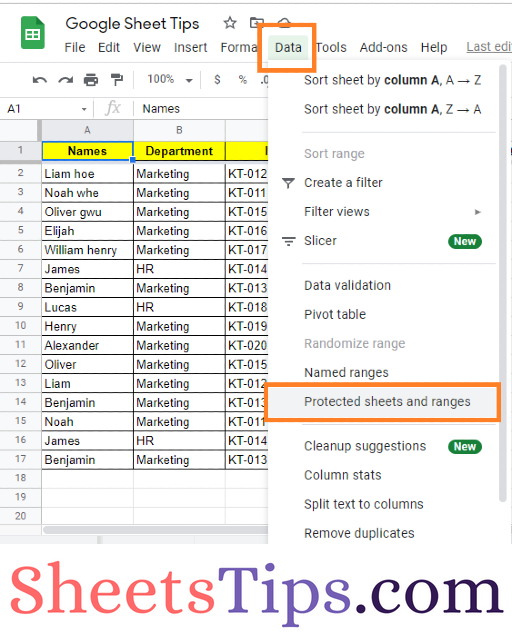
How To Protect Entire Google Worksheet?
We can easily protect individual worksheets in the Google Spreadsheet. To do so, go to the Data menu and select Protect sheet. Similar to a Google Doc, you can specify permissions to allow editing rights to anyone invited as a collaborator; only you; or a list of collaborators. You can place those cells in a “Results” worksheet and make it read-only if you need to prevent collaborators from modifying them. Formulas can refer to any worksheet, allowing data entry cells to be “opened” and formula cells to be “closed” in a protected worksheet.
- How to Turn On Notifications in a Google Spreadsheet in 2 Easy Steps
- How to Sync Data From One Google Sheet to Another Spreadsheet?
- How to Protect Range of Cells in Google Sheets? (Protect/Unprotect)
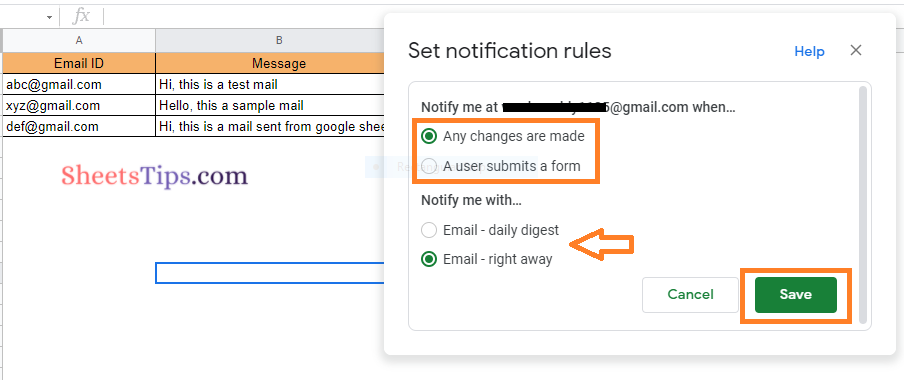
How To Set Up Notifications in Google Sheets?
We can also set up notifications in Google Sheets when a user tries to make some modifications in our protected cells. To do the same, go to the Tools menu and click Notification rules. You can choose to get notified when changes are made to the spreadsheet, a single worksheet, a cell or cell range, collaborators, or when a user submits a form (if the spreadsheet is linked to a form). Notifications can be sent immediately after a change or as a daily summary which is also known as a daily digest.
How To Set Data Validation to Protect Google Sheets?
We can also set a value that the cell must contain to prevent individual cells, or a group of cells, from being edited. we can enter a number, text, date, or list of items that come with further settings such as:
- A Number cell can be a range or maximum number
- A Text cell can contain or not contain words
- A Date cell can only be a valid date and
- A List column can only be populated from a list
We can also alert the editor that the validation rules haven’t been satisfied but still accept the change, or block any modifications that don’t satisfy the criteria.
Data validation is a great way to verify that cells with formulas aren’t accidentally edited. To do the same, follow these steps:
- Step 1: Choose the cell or range of cells you want to validate.
- Step 2: Now click on the Data tab and choose “Data Validation“.
- Step 3: Click the Text criteria and choose the 2nd drop down to “equals.“
- Step 4: Fill up the blanks with your cell formula.
- Step 5: Check the box that says “Reject Input” against On invalid data.
- Step 6: Click on the “Save” button.
